bookmark_borderputpixel in Linux

Some days ago I was trying to read a BMP format file and show it using putpixel.

I haved used qdbmp.sourceforge.net which is a minimalistic cross-platform C library for handling BMP image file.

The Allegro (www.allegro.cc) graphics library that provides many functionality.

putpixel
Writes a pixel into a bitmap.
Description void putpixel(BITMAP *bmp, int x, int y, int color);

Download qdbmp.c qdbmp.h from the qdbmp website

Sample code that reads a BMP file and show it using Allegro library

/*
* Example program for the Allegro library, by Shawn Hargreaves.
*
* This is a very simple program showing how to get into graphics
* mode and draw text onto the screen.
*/

#include <allegro.h>
/* Creates a negative image of the input bitmap file */
#include “qdbmp.h”
#include <stdio.h>

int main( int argc, char* argv[] )
{
BMP* bmp;
UCHAR r, g, b;
UINT width, height;
UINT x, y;

int color;
/* you should always do this at the start of Allegro programs */
if (allegro_init() != 0)
return 1;

/* set up the keyboard handler */
install_keyboard();

/* set a graphics mode sized 320×200 */
if (set_gfx_mode(GFX_AUTODETECT, 320, 200, 0, 0) != 0) {
if (set_gfx_mode(GFX_SAFE, 320, 200, 0, 0) != 0) {
set_gfx_mode(GFX_TEXT, 0, 0, 0, 0);
allegro_message(“Unable to set any graphic moden%sn”, allegro_error);
return 1;
}
}

/* set the color palette */
set_palette(desktop_palette);

/* clear the screen to white */
clear_to_color(screen, makecol(255, 255, 255));

/* you don’t need to do this, but on some platforms (eg. Windows) things
* will be drawn more quickly if you always acquire the screen before
* trying to draw onto it.
*/
acquire_screen();

/* write some text to the screen with black letters and transparent background */
// textout_centre_ex(screen, font, “Hello, world!”, SCREEN_W/2, SCREEN_H/2, makecol(0,0,0), -1);

if ( argc != 3 )
{
fprintf( stderr, “Usage: %s <input file> <output file>n”, argv[ 0 ] );
return 0;
}

/* Read an image file */
bmp = BMP_ReadFile( argv[ 1 ] );
BMP_CHECK_ERROR( stderr, -1 ); /* If an error has occurred, notify and exit */

/* Get image’s dimensions */
width = BMP_GetWidth( bmp );
height = BMP_GetHeight( bmp );

/* Iterate through all the image’s pixels */
for ( x = 0 ; x < width ; ++x )
{
for ( y = 0 ; y < height ; ++y )
{
/* Get pixel’s RGB values */
BMP_GetPixelRGB( bmp, x, y, &r, &g, &b );

color = makecol(r,g,b);

putpixel(screen, x, y, color);

/* Invert RGB values */
BMP_SetPixelRGB( bmp, x, y, 255 – r, 255 – g, 255 – b );
}
}

// putpixel(screen, SCREEN_W/2, SCREEN_H/2, 50);

/* you must always release bitmaps before calling any input functions */
release_screen();

/* wait for a key press */
readkey();

/* Save result */
BMP_WriteFile( bmp, argv[ 2 ] );
BMP_CHECK_ERROR( stderr, -2 );

/* Free all memory allocated for the image */
BMP_Free( bmp );

return 0;
}

END_OF_MAIN()

Compile
$gcc -g -O2 -o name `allegro-config –libs` sample.c qdbmp.c

Resources:
http://qdbmp.sourceforge.net/
http://www.allegro.cc/manual/api/drawing-primitives/putpixel
http://www.allegro.cc/manual/api/truecolor-pixel-formats/makecol
bookmark_borderProbhat in MacOS

I have ported the Probhat Layout (a bangla keyboad) in MacOS .

Download link
http://www.ankur.org.bd/wiki/Documentation#Mac_OS_X_2

* Unpack the zip file, there will be two files “Probhat.icns” and “Probhat.keylayout”.
* Paste these two files in “Macintosh HD/Library/Keyboard Layouts/” or “Home/Library/Keyboard Layouts/”, which will install the keyboard layout.

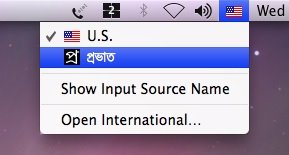
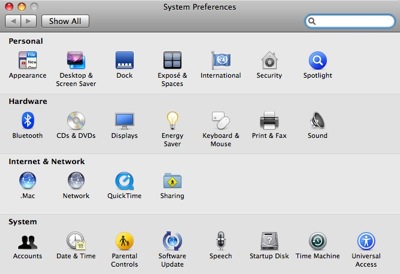
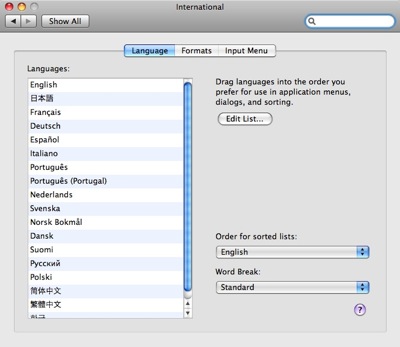
* Go to “System Preferences” > “International” > “Input Menu” scroll down and make sure that “Probhat” is checked.


* Make sure Show input menu in menu bar is checked, default English layout will be highlighted in the menu bar.

* Now click on “Keyboard Shortcuts” and in the “Input Menu” section put your desired keyboard shortcut that will enable you to change the keyboard layout (Our choice was Alt+Space).

* Now while typing in any application, pressing Alt+Space will switch to Probhat Layout and Probhat layout symbol will be highlighted in the menu bar.

bookmark_borderLDAP address book in Debian

#apt-get install slapd ldap-utils ldapscripts

edit /etc/ldap/slapd.conf
—————————-
//change the suffix accodring to your domain. here “example.com.bd”
suffix “dc=example,dc=com,dc=bd”

//uncomment this line
rootdn “cn=admin,dc=example,dc=com,dc=bd”

//add after rootdn line (it is plain text password)
rootpw secret

//change the dc=example,dc=com,dc=bd everywhere in slapd.conf
//keep other config as it is.

restart ldap
#/etc/init.d/slapd restart

edit /etc/ldap/ldap.conf

create a file name directory.ldif in /etc/ldap/schema/

directory.ldif
—————-
dn: dc=example,dc=com,dc=bd
objectClass: top
objectClass: dcObject
objectClass: organization
dc: example
o: Example Inc.

dn: ou=addressbook, dc=example,dc=com,dc=bd
objectClass: top
objectClass: organizationalUnit
ou: addressbook

from shell cd to /etc/ldap/schema/
$ldapadd -x -D ‘cn=admin,dc=example,dc=com,dc=bd’ -f directory.ldif -W
(give pass secret here)

To check
$ldapsearch -b ‘dc=example,dc=com,dc=bd’ ‘objectclass=*’ -x

Input data using phpldapadmin

#apt-get install phpldapadmin

http://localhost/phpldapadmin/

login: cn=admin,dc=example,dc=com,dc=bd
pass: secret

or you can add data manually

create a file contact.ldif in /etc/ldap/schema/

contact.ldif
————–
dn: cn=Blogger OS, ou=addressbook,dc=example,dc=com,dc=bd
objectClass: top
objectClass: person
objectClass: organizationalPerson
objectClass: inetOrgPerson
cn: Blogger
gn: Ldap
sn: OS
mail: blogger@example.com.bd
physicalDeliveryOfficeName: Dhaka, Bangladesh.
postalAddress: PO BOX 909
ou: addressbook
st: LA
postalCode: 1215
telephoneNumber: 111-111-1111
facsimileTelephoneNumber: 111-111-1111
pager: 111-111-1111
mobile: 111-111-1111
homePhone: 111-111-1111

from shell cd to /etc/ldap/schema/
$ldapadd -x -D ‘cn=admin,dc=example,dc=com,dc=bd’ -f contact.ldif -W
(give pass secret here)

To check
$ldapsearch -b ‘dc=example,dc=com,dc=bd’ ‘objectclass=*’ -x

Reference:
ONLamp.com Link

OpenLDAP Link

bookmark_borderTriple Boot in MacBook (Debian AMD64) using rEFIt


I have got success to create triple boot in mac book using rEFIt

salahuddin-pashas-computer:~ salahuddin$ diskutil list
/dev/disk0
#: type name size identifier
0: GUID_ partition_scheme *111.8 GB disk0
1: EFI 200.0 MB disk0s1
2: Apple_HFS Macintosh HD 111.2 GB disk0s2

Resize the volume

diskutil resizeVolume /dev/disk$OSX OSXpartsize 2ndPartType 2ndPartLabel 2ndPartSize 3rdPartType 3rdPartLabel 3rdPartSize

Here I am giving

diskutil resizeVolume /dev/disk0s2 71.1G Linux Linux 25G “MS-DOS FAT32” Windows 15G
(If you face problem while resizing the partitions, install/reinstall a fresh copy of Mac OS)

Install rEFIt in Mac OS (Mac disk image)

reboot your mac book and ensure that rEFIt is loading at boot time.

Boot Windows XP SP2 32bit, you will find the CD appear in the boot menu of rEFIt or use ‘C’ to boot. Now install it sda4
(warning: just format the sda4 in (fat32 or ntfs) while installing windows, but do not repartition/change anything!!!)

reboot and you will find 2 option for booting the Mac OS and Windows.
(warning: do not update the partition record in the rEFIt now, the Linux partition may update as fat32)

Installing Debian:

Get the AMD64 version of Debian (you can also use generic 32 bit)

Install Debian normally without the grub or lilo

(when it will try to install grub or lilo use go back, and from main menu select finish installation from Debian installation CD.)

From rEFIt menu update the partition record. Important!!!

Now boot with Debian installation CD up to the partitioning.
(otherwise you will face problem while installing lilo)
(*** you can see the easy way below after update the partition table)

go to console mode
ctrl+alt+F2
mkdir /tmp/debian
mount /dev/sda3 /tmp/debian
chroot /tmp/debian
mount /proc
apt-get install lilo
nano /etc/lilo.conf

sample lilo config

boot=/dev/sda3
default=Debian

map=/boot/map
delay=20
image=/vmlinuz initrd=/initrd.img
root=/dev/sda3
label=Debian
read-only

Install lilo in sda3
lilo -b /dev/sda3

done…

(***another easy way is install debian from begining again, now install lilo in /dev/sda3)(do not install grub) done…

After reboot you will find 3 OS boot option in rEFIt menu.

Important configuration!!!

Install CPU frequency, otherwise you mac book can be too hot in a short time.
http://wiki.debian.org/MacBook#head-7271d26c7c6e311218ca20422f7eb86e76a6d5e3

Configure the Color Profile (install xcalib using apt) http://gentoo-wiki.com/HARDWARE_Apple_MacBook#Colour_Profilept

F1, F2, F3… Key configuration
apt-get install pommed

Reference
http://wiki.debian.org/MacBook

Resources
http://wiki.debian.org/MacBook
http://wiki.onmac.net/index.php/Triple_Boot_via_BootCamp_Ubuntu
http://gentoo-wiki.com/HARDWARE_Apple_MacBook

bookmark_borderCheck date in Java Script

here is my date check javascript.

function leapyearcheck(year)
{

if(year.value % 4 != 0)
{
return 0;
}

else
{
if(year.value % 100 != 0)
{
return 1; //leap year
}

else
{

   if(year.value % 400 != 0)
   {
   return 0
   }

   else
   return 1;  //leap year

}

}
}


function datecheck(day,month,year) //call this function
{
//alert(day.value);

if(!leapyearcheck(year))
{
//alert("Not Leap Year");

   if(month.value == 2)
   {
       if(day.value > 28)
       {
       alert("Check the Day and Month");
       return false;
       }

   }
}

else

{

//alert("Leap Year");
if(month.value == 2)
   {
       if(day.value > 29)
       {
       alert("Check the Day and Month");
       return false;
       }
   }

}


Thanks to HasinHyder for a tricky one..

var dt = new Date(year+"/02/29");
if (dt.getMonth()=="1")
alert (year + " is a leap year");
else
alert(year + " is not a leap year")


bookmark_bordermdb file in OpenOffice.org

To work with mdb file, open the OpenOffice.org-base select connect to an existing database, select Microsoft Access.


browse the mdb file and you need to save a odb file that will enable you to view the tables,query etc on it.

To copy the content of a table in OpenOffice.org Calc
go to View–> Data Sources


right click in the left pannel of in the database view option, click on the “Registered databases”, click “New” and locate your created odb file.


Click on the database you want to copy. Select the Queries/Tables and copy the content by righ click on the query/table name.

Paste in the OpenOffice.org-Calc. Now you can save in ods, and also save as in different formats.

Today I got success to configure phpbb with wordpress.It will enable the phpbb registered user to login the wordpress blog (after get approve from admin) with same id and password.I tried with phpBB-2.0.22 and wordpress-2.2.1Simply after install both in a same database.create a connections.php in the includes directory of the phpbbconnections.php

<?php$con = mysql_connect(“localhost”,”your_username”,”your_password”);

if (!$con){die(‘Could not connect: ‘ . mysql_error());}mysql_select_db(“your_database”, $con);?>

edit includes/usercp_register.php of the phpbbaround 630 lines you will find some line like this

/ Get current date//$sql = “INSERT INTO ” . USERS_TABLE . ” (user_id, …);

Bellow this line add

// added by salahuddin66include_once(“connections.php”);

$query = “INSERT INTO wp_users (user_login, user_nicename, display_name, user_pass, user_email, user_registered) VALUES (‘” . str_replace(“‘”, “””, $username) . “‘, ‘” . str_replace(“‘”, “””, $username) . “‘, ‘”. str_replace(“‘”, “””, $username) . “‘, ‘” . str_replace(“‘”, “””, $new_password) . “‘, ‘” . str_replace(“‘”, “””, $email).”‘, NOW() )”;

if (!mysql_query($query,$con)){die(‘Error: ‘ . mysql_error());}

// finish added by salahuddin66

done..Now the users will register for the phpbb forum will also register for the wordpress blog automatically.To enable his wordpress account, wordpress admin need to give him approve/some role.