bookmark_borderSamsung ML-1666 printer in Linux

Samsung ML-1666

Unfortunately, splix does not support this model. So, you have to download Linux driver from: Samsung Website

You can either run their automated installer or install it manually.
I prefer manual installation because, automated installer install many unnecessary tools in my system.

 1. locate the ML-1660 from the Unified driver PPD while adding printer:

/cdroot/Linux/noarch/at_opt/share/ppd/ML-1660spl.ppd

2.Copy the filter, depending on your system (32bit or 64bit):

 /cdroot/Linux/x86_64/at_root/usr/lib64/cups/filter/rastertosamsungspl –> /usr/lib/cups/filter/ 

3. You may need to install libtiff and splix or may try to modify the ML-1660.ppd for splix support. But, be inform that, from splix website “Splix won’t support old SPL(1) printers.”

bookmark_borderMultiple Internet connection in Linux

I was facing trouble to use EDGE/GPRS (ppp) with another Ethernet connection together.
Ethernet connection was used for local network.

# ip route show
10.64.64.64 dev ppp0  proto kernel  scope link  src 10.130.4.218
192.168.1.0/24 dev eth0  proto kernel  scope link  src 192.168.1.2  metric 1
default via 192.168.1.1 dev eth0  proto static

ppp connected but still default route is eth0. To use the ppp connection as default

# ip route change default via 10.64.64.64 dev ppp0

You will find

# ip route show
10.64.64.64 dev ppp0  proto kernel  scope link  src 10.130.4.218
192.168.1.0/24 dev eth0  proto kernel  scope link  src 192.168.1.2  metric 1
default via 10.64.64.64 dev ppp0

remember you may need to set the nameserver (edit the /etc/resolv.conf).

On the other hand you may have 2 default connection settings:

# ip route show
10.64.64.64 dev ppp0  proto kernel  scope link  src 10.130.130.252
192.168.1.0/24 dev eth0  proto kernel  scope link  src 192.168.1.1
172.16.0.0/16 dev eth1  proto kernel  scope link  src 172.16.8.69
default via 172.16.8.1 dev eth1
default via 10.64.64.64 dev ppp0  proto static

I mainly want to use ppp0, so I am removing the eth1 from default list:

#ip route del default via 172.16.8.1

If you want to use multiple uplinks/providers:
http://tldp.org/HOWTO/Adv-Routing-HOWTO/lartc.rpdb.multiple-links.html
http://lartc.org/howto/lartc.rpdb.multiple-links.html

example:

#ip route change default scope global nexthop via 10.64.64.64 dev ppp0  weight 2 nexthop via 192.168.1.1 dev eth0 weight 1

Install “iptraf”, which is an useful tool for analysis:

#apt-get install iptraf

You can also define any IP address  to use specific connection.
This might helpful if you want to listen on-line radio without interrupting your main work.

I am specifying an IP address for listening an on-line radio station by using a backup slow connection via eth1:

#ip route add 85.xx.174.181 via 172.16.8.1 dev eth1

-enjoy

bookmark_borderAntiderivative to find Area

“Why should I apply Antiderivative to find area of a function ?”

It might seems a very silly question, but I was searching for a solution.
I got some idea from Wikipedia Fundamental theorem of calculus , but still I was looking for example.

At last, I have found answer from these:

1. Area function f(x) = 2 within interval [a,x] = [-1,x]

Let assume, the distance of the rectangle from 0 is x.
Total Length of the rectangle will be x+1 over x-axis and width is 2.

Area = length * width

A(x) = 2(x+1) = 2x + 2

Derivative of A(x) is:
A/(x) = 2 = f(x)

2. Area function f(x) =x+1 within interval [a,x] = [-1,x]

Triangle Area = 1/2 * base * height

A(x) = 1/2 (x+1)(x+1) = x2/2 + x + 1/2

Derivative of A(x) is:
A/(x) = x + 1 = f(x)

3. Area function f(x) = 2x+3 within interval [a,x] = [-1,x]

Trapezoid Area = 1/2 * h * (a+b)

h = heigh
a,b is the parallel sides lengths.

A(x) = 1/2 (x+1)((2x+3)+1) = x2 + 3x + 2

Derivative of A(x) is:
A/(x) = 2x + 3 = f(x)

Result:
This is not only valid for linear function, but also for continuous function.
To find the area of  a function we can simply apply antidifferentiation.

A(x)  representing the area
A/(x) representing the area function.

If we know the area function A/(x) we can get the area by antidifferentiation which will provide us A(x) (area of the function).

Powered by gnuplot

Source:
Calculus – Early Transcendentals by Anton, Bivens, Davis.
http://en.wikipedia.org/wiki/Fundamental_theorem_of_calculus#Geometric_intuition
http://en.wikipedia.org/wiki/Rectangle
http://en.wikipedia.org/wiki/Triangle
http://en.wikipedia.org/wiki/Trapezoid

bookmark_borderDebian Kiosk

I have configured a kiosk using Debian GNU/Linux with blackbox window manager.

The challenges:
1. Touchscreen configuration.
2. Autometic login and start X server.
3. Start desired application for kiosk.
4. A boot splash for booting and shutdown.
 
1. Touchscreen configuration:
First, setup touchscreen driver and configure it according to your device specification.
I was using eGalax driver, which I have downloaded from
source: http://home.eeti.com.tw/web20/eg/drivers.htm

2. Automatic login:
Edit /etc/inittab and comment the following line:

#1:2345:respawn:/sbin/getty 38400 tty1

add the following line below:

1:2345:respawn:/bin/login -f USER_LOGIN tty1 /dev/tty1 2>&1 

Edit .bash_profile (create if require) and add the following line at bottom:

startx

source: http://www.debianadmin.com/how-to-auto-login-and-startx-without-a-display-manager-in-debian.html

Blackbox window manager:
Edit ~/.xinitrc (or ~/.Xsession), create if require, and add the following line:

exec blackbox

3. Autostart application:
To autostart iceweasel/firefox:
Again edit ~/.xinitrc (or ~/.Xsession) and add the following line:

firefox &
exec blackbox

source: http://blackboxwm.sourceforge.net/BlackboxFAQ/StartupAndShutdown

Install iceweasel/firefox plugin “R-kiosk” from https://addons.mozilla.org/en-US/firefox/addon/1659

3. Bootsplash:
Install a bootsplash

apt-get install splashy

Create your own bootsplash and set it

# splashy_config -c

To enable splashy, you may need to edit grub.config and add the following after “kernel…ro quiet”

vga=791 splash

source: http://splashy.alioth.debian.org/wiki/faq

Tips and tricks:
“X: user not authorized to run the X server”
You can allow the user to use run startx by:

#dpkg-reconfigure x11-common

or edit  /etc/X11/Xwrapper.config

allowed_users=anybody 

“Auto login problem”
 If you have setup GDM (XDM) earlier, then you need to disable it for automatic log in

#update-rc.d -f gdm remove

If you want to enable it simply run (experiment purpose):

#update-rc.d -f gdm defaults

source: http://www.debianadmin.com/howto-boot-debian-in-text-mode-instead-of-graphical-mode-gui.html

Kiosk performance tuning:
Install the CPU frequency related tools and configure it.
details: http://wiki.debian.org/HowTo/CpuFrequencyScaling

resources:
http://www.debianadmin.com/debirf-build-a-kernel-and-initrd-to-run-debian-from-ram.html
http://cmrg.fifthhorseman.net/wiki/debirf

bookmark_borderCustom Font Example iPhone

An example for using custom font in iPhone.

Initially, I have tried with UIFont for using custom font, but it seems not possible.

Documents from apple:
http://developer.apple.com/iphone/library/documentation/GraphicsImaging/Reference/CGFont/Reference/reference.html

Create custom font using CGDataProvider:

NSString *fontPath = [[NSBundle mainBundle] pathForResource:@”CUSTOM_FONT” ofType:@”ttf”];
CGDataProviderRef fontDataProvider = CGDataProviderCreateWithFilename([fontPath UTF8String]); CGFontRef customFont = CGFontCreateWithDataProvider(fontDataProvider);

Use the font:

CGContextSetFont(context, customFont);
CGContextSetFontSize(context, 34.0);
CGContextSetTextDrawingMode(context, kCGTextFill);
CGGlyph textToPrint[[mainString length]];
// Loop through the entire length of the text.
for (int i = 0; i < [mainString length]; ++i) { // Store each letter in a Glyph and subtract the MagicNumber to get appropriate value.
textToPrint[i] = [[mainString uppercaseString] characterAtIndex:i] + 332;
}

//to understand the MagicNumber, I open the font file using FontForge
//found that the font I am using started from location 32
//after I changed the “Encoding->Reencode” to “Glyph Order”
//I found that the “U+0020 space” started from location 3
//

bookmark_borderSpeech detection example iPhone

This is an example, how to start working on speech detection application for iPhone.

We have two major task:
1. Access the audio data.
2. Implement the logic part.

Task1: Access the audio data:
Download SpeakHere Example code from Apple:
http://developer.apple.com/iphone/library/samplecode/SpeakHere/index.html

Open “Classes->Play & Record->AQRecorder.mm” and edit the folloding function:

// AudioQueue callback function, called when an input buffers has been filled. void AQRecorder::MyInputBufferHandler(...)

Add the following code to access the audio data:

 //for signed 16-bit little-endian
 SInt16 *buf = (SInt16 *)inBuffer->mAudioData;
 for(int i=0; i< inBuffer->mAudioDataByteSize / 2; i=i+2) {
  printf("n%dn%d ", buf[i], buf[i+1]);
 }

(Please feel free to let me know if I am doing anything wrong…)

Run the application. You will get the raw data in gdb/console/log.
Copy the data in a text file and plot it.

Download gnuplot and AquaTerm

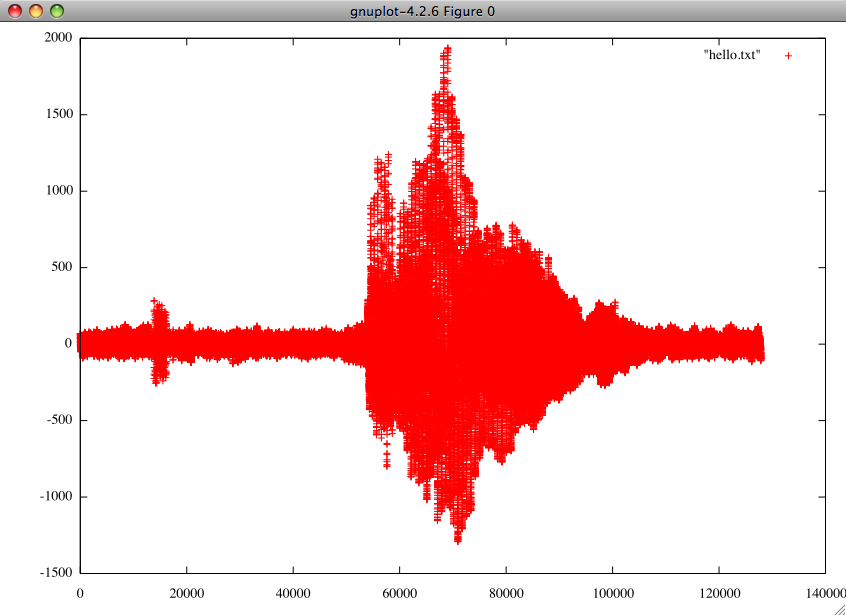
I have copied the data in a text file name “hello.txt” and saved it in my home directory.
Plot this, in gnuplot using the following command:

gnuplot>plot “hello.txt”

Task2: Implement the logic part:

For speech detection purpose we do not need to check all the data. Set some filter to check the data within some range. You can also try with the maximum and minimum value.


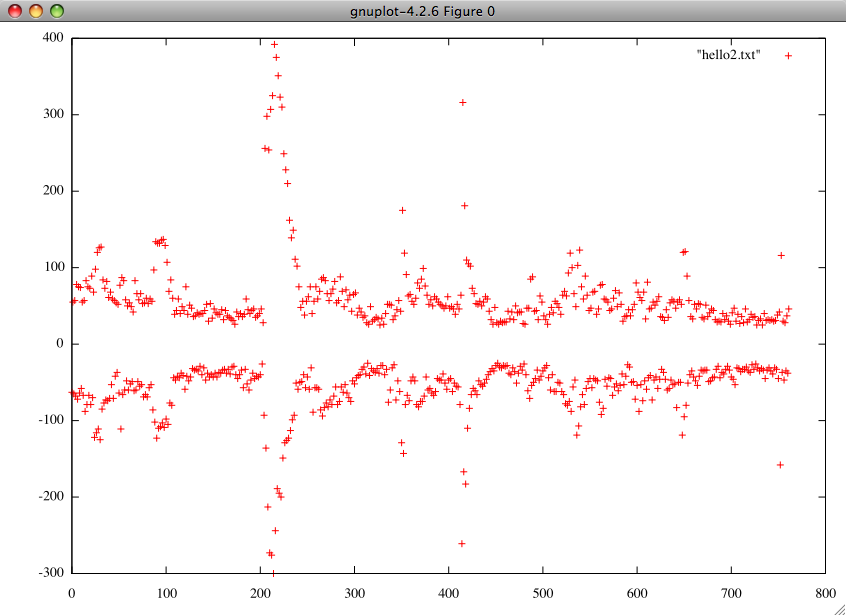
As the maximum and minumum value is similar, you can simply check one part.

If you want to detect specific type of speech or sound, analyze the graph by taking some sample.
Understand the logic and implement a coded logic to detect it.

For normal detection purpose take many sample and do R&D youself.

Please note that the mic “Input Volume” may affect your data.

bookmark_borderRadio App Example iPhone

I was working on an application to play audio stream from an online radio. Here is some hints for the developers who want to do similar types of work.

Initially we have two major task:
1. Read stream data.
2. Play the stream data.

From apple developer documentation:

http://developer.apple.com/iphone/library/codinghowtos/AudioAndVideo/index.html#STREAMING

How do I play streamed audio?

To play streamed audio, you connect to a network stream using the CFNetwork interfaces from Core Foundation, such as those in CFHTTPMessage. You then parse the network packets into audio packets using Audio File Stream Services (AudioToolbox/AudioFileStream.h). Finally, you play the audio packets using Audio Queue Services (AudioToolbox/AudioQueue.h). You can also use Audio File Stream Services to parse audio packets from an on-disk file.

Task 1: Working with HTTP stream

Read “CFNetwork Programming Guide” specially the “Communicating with HTTP Servers” part.

Use the callback

if (CFReadStreamSetClient(myReadStream, registeredEvents, myCallBack, &myContext) {...}

A sample callback:

static void myCallBack
(CFReadStreamRef stream, CFStreamEventType type, void *clientCallBackInfo) {
if(type == kCFStreamEventHasBytesAvailable) {
UInt8 buffer[2048];
CFIndex bytesRead = CFReadStreamRead(stream, buffer, sizeof(buffer));

if (bytesRead > 0) {
//nothing
}
else if (bytesRead) {
NSString* to_add = [NSString stringWithCString: (char*)buffer length: bytesRead];
NSLog(@"%@", to_add);
}
}
}

Run the application. If you can see the HTML tag in your debug console, then your network stream reading is working fine.

Task 2: Working with audio

Read “Audio File Stream Services Reference” to get basic idea about the streaming audio.

Check the “AudioFileStreamExample” from:
http://developer.apple.com/Mac/library/samplecode/AudioFileStreamExample/index.html

Merge the “AudioFileStreamParseBytes” with the “myCallBack” method.

Download Sample Code:
http://www.mymacbd.com/forum/viewtopic.php?id=26

bookmark_bordernasm in Mac OS X

I was trying to compile a simple assembly program in Mac OS X (Leopard).

I was getting an error message

ld: could not find entry point “_start” (perhaps missing crt1.o) for inferred architecture i386

A simple asm program for FreeBSD and MacOS
(we have to use the stack for system call, from http://asm.sourceforge.net//howto/Assembly-HOWTO.rtf)

section     .text
global _start ;must be declared for linker (ld)

_syscall:
int 0x80 ;system call
ret

_start: ;tell linker entry point

push dword len ;message length
push dword msg ;message to write
push dword 1 ;file descriptor (stdout)
mov eax,0x4 ;system call number (sys_write)
call _syscall ;call kernel

;the alternate way to call kernel:
;push eax
;call 7:0

add esp,12 ;clean stack (3 arguments * 4)

push dword 0 ;exit code
mov eax,0x1 ;system call number (sys_exit)
call _syscall ;call kernel

;we do not return from sys_exit,
;there's no need to clean stack
section .data

msg db "Hello, world!",0xa ;our dear string
len equ $ - msg ;length of our dear string

In Mac OS X we should use format macho

nasm -f macho hello.asm

and for the linker (we need to specify the entry point)

ld -e _start -o hello hello.o

resources:
http://asm.sourceforge.net//howto/Assembly-HOWTO.rtf
http://zathras.de/angelweb/blog-intel-assembler-on-mac-os-x.htm

bookmark_borderrecover kopete password

I was trying to recover a password from a kopeterc file.

Open the kopeterc file in a hex editor
In the password location you will find three-byte chunks: [EF][BE][XX]. The first two bytes stay most of the time same.
Just subtract each third byte from 0x1001F then you will get the character value from ASCII table.

everything was working fine as mentioned in Raphman’s blog

But I had a little problem with numeric value. My combination was “EF BE XX” but before the numeric value it was “EF BF XX”.

For the numeric value I have to subtract 0x40 again to get the original value.

It worked for me at last…

src: http://my.opera.com/raphman/blog/2008/02/01/kde-pasword-obfuscation?cid=7484288

bookmark_borderBengali in LaTeX in Mac OS X

I have installed LaTeX for Mac OS from http://www.tug.org/mactex/

I was trying to write Bangla in LaTex. Found two ways to write bangla in LaTeX.

Unicode Standard

written by Golam Mortuza Hossain. Here I am just writing how to do this in Mac OS.

First download freefont-ttf-xyz.tar.gz from

http://savannah.nongnu.org/download/freefont/

or
ftp://ftp.gnu.org/pub/gnu/freefont/

which containing
————————-
FreeSerif.ttf
FreeSerifBold.ttf
FreeSerifItalic.ttf
FreeSerifBoldItalic.ttf

Paste these fonts in your “Macintosh HD/Library/Fonts/”

Now try sample document in TeXShop

documentclass{article}
usepackage{fontspec}
%
% This file is a based on the sample tex file to illustrate use of
% XeTeX in typesetting Bengali document.
% License under GNU FDL by Golam Mortuza Hossain, 2008
%
%url: http://methopath.wordpress.com/2008/06/26/writing-unicode-bengali-in-latex/
%
fontserif=”FreeSerif:script=beng”
fontserifbb=”FreeSerif:script=beng” at 24pt
fontdeffont=”FreeSerif:script=beng” at 14pt

title{bfserifbb সত্যজিৎ রায়}
author{bfserif উইকিপিডিয়া, মুক্ত বিশ্বকোষ থেকে}
date{}
begin{document}
deffont %Default font used for the document
maketitle
সত্যজিৎ রায় (২রা মে, ১৯২১ – ২৩শে এপ্রিল, ১৯৯২) একজন বাঙালী চলচ্চিত্র নির্মাতা ও বিংশ শতাব্দীর অন্যতম শ্রেষ্ঠ চলচ্চিত্র পরিচালক। কলকাতা শহরে সাহিত্য ও শিল্পের জগতে খ্যাতনামা এক বাঙালী পরিবারে তাঁর জন্ম হয়। তিনি কলকাতার প্রেসিডেন্সি কলেজ ও শান্তিনিকেতনে রবীন্দ্রনাথ ঠাকুরের প্রতিষ্ঠিত বিশ্বভারতী বিশ্ববিদ্যালয়ে পড়াশোনা করেন। সত্যজিতের কর্মজীবন একজন বাণিজ্যিক চিত্রকর হিসেবে শুরু হলেও প্রথমে কলকাতায় ফরাসি চলচ্চিত্র নির্মাতা জঁ রনোয়ারের সাথে সাক্ষাৎ ও পরে লন্ডন শহরে সফররত অবস্থায় ইতালীয় নব্য বাস্তবতাবাদী ছবি লাদ্রি দি বিচিক্লেত্তে (ইতালীয় ভাষায় Ladri di biciclette, “সাইকেল চোর”) দেখার পর তিনি চলচ্চিত্র নির্মাণে উদ্বুদ্ধ হন।
end{document}

Select “XeLaTeX” from drop down menu and click “Typeset” button for Output in TeXShop.

reference: http://methopath.wordpress.com/2008/06/26/writing-unicode-bengali-in-latex/

Bangtex

First Bengali typesetting system using LaTeX. Which use a non-standard approach to write bangla.

example:

centerline{bngxxv ra*g*er OShudh}
centerline{bngxviii sukumar ray}

———————————–
which give output
———————————–
রোগের ওষুধ
সুকুমার রায়

download bfonts.tar.gz, bsty.tar.gz, bsample.tar.gz from
http://www.saha.ac.in/theory/palashbaran.pal/bangtex/bangtex.html

Installing the font files
cd /usr/local/texlive/2008/texmf-dist/fonts/source
sudo mkdir bangla
extract bfonts.tar.gz in /usr/local/texlive/2008/texmf-dist/fonts/source/bangla/
Installing the macro files for LaTeX
cd /usr/local/texlive/2008/texmf-dist/tex/latex
sudo mkdir bangla
extract bsty.tar.gz /usr/local/texlive/2008/texmf-dist/tex/latex/bangla/
Initializing the files
sudo texhash

reference: http://www.saha.ac.in/theory/palashbaran.pal/bangtex/install.html#linux