bookmark_borderXen Installation in debian etch

Install Xen first

#apt-get update #apt-get install xen-hypervisor-3.0.3-1-i386 xen-utils-3.0.3-1 #apt-get install linux-image-2.6.18-4-xen-686
give the version no according to you deb repository. edit /etc/xen/xend-config.sxp ------------------------------ uncomment this two line
(network-script network-bridge) (vif-script vif-bridge)
Install tools for xen
#apt-get install bridge-utils iproute sysfsutils libc6-xen xen-tools
Create a directory
#mkdir /home/xen
edit /etc/xen-tools/xen-tools.conf here is my sample config file (Here I am showing only uncomment part)
dir = /home/xen debootstrap = 1 # Disk and Sizing options. ## # size = 1Gb # Disk image size. memory = 128Mb # Memory size swap = 128Mb # Swap size # noswap = 1 # Don't use swap at all for the new system. fs = ext3 # use the EXT3 filesystem for the disk image. dist = etch # Default distribution to install. image = full # Specify sparse vs. full disk images. ## # Networking setup values. ## # # Uncomment and adjust these network settings if you wish to give your # new instances static IP addresses. # gateway = 192.168.7.1 netmask = 255.255.255.0 # # Uncomment this if you wish the images to use DHCP # # dhcp = 1 # Uncomment the following line if you wish to interactively setup # a new root password for images. # passwd = 1 # Default kernel and ramdisk to use for the virtual servers # kernel = /boot/vmlinuz-2.6.18-4-xen-686 initrd = /boot/initrd.img-2.6.18-4-xen-686 # The default mirror for debootstrap which can be used to install # Debian Sid, Sarge, and Etch. # mirror = http://ftp.debian.org/debian/
To create an image (here I am showing with debootstraping)
#xen-create-image --hostname=test --ip=192.168.7.90 --passwd
it will ask for the root passwd after finish the debootstrap. edit /etc/xen/test.cfg check the kernel version is correct for your system
kernel = '/boot/vmlinuz-2.6.18-4-xen-686' ramdisk = '/boot/initrd.img-2.6.18-4-xen-686'
xen-tools generate the disk sda for me. Later I change it to hda
root = '/dev/hda1 ro' disk = [ 'file:/home/xen/domains/test/disk.img,hda1,w', 'file:/home/xen/domains/test/swap.img,hda2,w' ]
check you ip
if = [ 'ip=192.168.7.90' ]
To start the vm
#xm create test.cfg -c
it will start to boot (simple output) -------------------------------------
checking file systems...fsck 1.40-WIP (14-Nov-2006) done. Setting kernel variables...done. Mounting local filesystems...done. Activating swapfile swap...done. Setting up networking.... Configuring network interfaces...done. INIT: Entering runlevel: 2 Starting system log daemon: syslogd. Starting kernel log daemon: klogd. * Not starting internet superserver: no services enabled. Starting OpenBSD Secure Shell server: sshdNET: Registered protocol family 10 lo: Disabled Privacy Extensions IPv6 over IPv4 tunneling driver . Starting periodic command scheduler: crond. Debian GNU/Linux 4.0 test tty1 test login:
or use
#xenman
file-->open Domain File and select the /etc/xen/test.cfg Here is the nmap output for ip 192.168.7.90
Interesting ports on test (192.168.7.90): Not shown: 1696 closed ports PORT STATE SERVICE 22/tcp open ssh MAC Address: 00:16:3E:1F:8F:58 (Xensource) Device type: general purpose Running: Linux 2.6.X OS details: Linux 2.6.17.9 (X86) Uptime: 198.839 days (since Tue Oct 31 15:09:34 2006) Network Distance: 1 hop
Now I can ssh to my 192.168.7.90
#debian:/home/salahuddin# ssh root@192.168.7.90 root@192.168.7.90's password: Last login: Fri May 18 05:50:41 2007 Linux test 2.6.18-4-xen-686 #1 SMP Mon Mar 26 21:49:04 UTC 2007 i686 The programs included with the Debian GNU/Linux system are free software; the exact distribution terms for each program are described in the individual files in /usr/share/doc/*/copyright. Debian GNU/Linux comes with ABSOLUTELY NO WARRANTY, to the extent permitted by applicable law. test:~# ifconfig eth0 Link encap:Ethernet HWaddr 00:16:3E:15:BC:3F inet addr:192.168.7.90 Bcast:192.168.7.255 Mask:255.255.255.0 inet6 addr: fe80::216:3eff:fe15:bc3f/64 Scope:Link UP BROADCAST RUNNING MULTICAST MTU:1500 Metric:1 RX packets:92 errors:0 dropped:0 overruns:0 frame:0 TX packets:36 errors:0 dropped:0 overruns:0 carrier:0 collisions:0 txqueuelen:1000 RX bytes:15420 (15.0 KiB) TX bytes:5239 (5.1 KiB) lo Link encap:Local Loopback inet addr:127.0.0.1 Mask:255.0.0.0 inet6 addr: ::1/128 Scope:Host UP LOOPBACK RUNNING MTU:16436 Metric:1 RX packets:0 errors:0 dropped:0 overruns:0 frame:0 TX packets:0 errors:0 dropped:0 overruns:0 carrier:0 collisions:0 txqueuelen:0 RX bytes:0 (0.0 b) TX bytes:0 (0.0 b) test:~#halt Broadcast message from root@test (ttyp0) (Fri May 18 06:16:58 2007): The system is going down for system halt NOW! test:~# Connection to 192.168.7.90 closed by remote host. Connection to 192.168.7.90 closed. debian:/home/salahuddin#
Note: Change your kernel path and disk config according to your system. First time I tried with image = sparse in /etc/xen-tools/xen-tools.conf but it did not work for me. Later I give image = full. for more doc: http://wiki.debian.org/Xen http://www.debian-administration.org/articles/396 http://www.howtoforge.com/perfect_setup_xen3_debian https://help.ubuntu.com/community/XenVirtualMachine/XenOnUbuntuEdgy
bookmark_borderchkrootkit and logcheck

chkrootkit and logcheck mail notification

#apt-get install cron
#crontab /etc/crontab
#apt-get install chkrootkit

write a script ‘chkrootkit’ and save in /

#/bin/bash
cd /usr/sbin/ && ./chkrootkit 2>&1 | mail -s “chkrootkit output” yourname@xyz.com

#chmod 777 / chkrootkit
#apt-get install logcheck

we edit the /etc/logcheck/logcheck.conf

INTRO=1
REPORTLEVEL=”server”
SENDMAILTO=”yourname@xyz.com”
FQDN=1
RULEDIR=”/etc/logcheck”

then we write a script ‘logcheck’ and save in /

#/bin/bash
su -s /bin/bash -c “/usr/sbin/logcheck” logcheck

#chmod 777 /logcheck
we add the chkrootkit and logcheck script in the /var/spool/cron/crontabs/root

46 12 * * * /./chkrootkit
46 12 * * * /./logcheck

done 🙂

bookmark_borderRsync and SSH

This Rsync and ssh is to automatically backup files from one server to another.

for more doc follow this link

We generate a key

$ ssh-keygen -t dsa -b 2048 -f /home/thisuser/cron/thishost-rsync-key
Generating public/private dsa key pair.
Enter passphrase (empty for no passphrase): [press enter here]
Enter same passphrase again: [press enter here]
Your identification has been saved in /home/thisuser/cron/thishost-rsync-key.
Your public key has been saved in /home/thisuser/cron/thishost-rsync-key.pub.
The key fingerprint is:
2e:28:d9:ec:85:21:e7:ff:73:df:2e:07:78:f0:d0:a0 thisuser@thishost

Copy the public key to remove PC

$ scp /home/thisuser/cron/thishost-rsync-key.pub remoteuser@remotehost:/home/remoteuser/

Configuring remotehost

$ ssh remoteuser@remotehost remoteuser@remotehost’s password: [type correct password here]

need to make sure we have the directory and files we need to authorize connections with this key

$ if [ ! -d .ssh ]; then mkdir .ssh ; chmod 700 .ssh ; fi
$ mv thishost-rsync-key.pub .ssh/
$ cd .ssh/
$ if [ ! -f authorized_keys ]; then touch authorized_keys ; chmod 600 authorized_keys ; fi
$ cat thishost-rsync-key.pub >> authorized_keys

we edit the ‘authorized_keys’ file (with vi)

before edit

ssh-dss AAAAB3NzaC1kc3MAAAEBAKYJenaYvMG3nHwWxKwlWLjHb77CT2hXwmC8Ap+ fG8wjlaY/9t4uA+2j2yBgN5cy8arlZ80q1Mcy763RjYGkR/FkLJ611HWIA= thisuser@thishost

we made the following change

from=”10.1.1.1″,command=”/home/remoteuser/cron/validate-rsync” ssh-dss AAAAB3Nza
C1kc3MAAAEBAKYBgN5cy8arlZ80q1Mcy763RjYGkR/FkLJ611HWIA= thisuser@thishost

your can omit the ‘from=”10.1.1.1″,’ part of the line (including the comma), then ‘rsync’ will be possible using this key from anywhere.

create a script /home/remoteuser/cron/validate-rsync

#!/bin/sh

case “$SSH_ORIGINAL_COMMAND” in
*&*)
echo “Rejected”
;;
*(*)
echo “Rejected”
;;
*{*)
echo “Rejected”
;;
*;*)
echo “Rejected”
;;
*

bookmark_borderIcecast2 Streaming server

I have test in Debian testing (Sid)

for more doc www.xiph.org

# apt-get install icecast2

edit /etc/default/icecast2
icecast2
=====
ENABLE=true
=====

start the icecast
/etc/init.d/icecast2 start

edit /etc/icecast2/icecast.xml enable the relay if you want.

There are two types of relays: a “Master server relay” or a “Specific Mountpoint relay.” A Master server relay is only supported between icecast2 servers and is used to relays all mountpoints on a remote icecast2 server.

icecast.xml
=======
master-server 127.0.0.1 master-server
master-server-port 8001 master-server-port
master-update-interval 120 master-update-interval
master-password hackme master-password

relays-on-demand 1 relays-on-demand
on-demand 1 on-demand
relay-shoutcast-metadata 1 relay-shoutcast-metadata

example:

relay
server 127.0.0.1 server
port 8001 port
mount /example.ogg mount
local-mount different.ogg local-mount
on-demand 1 on-demand

(if your want to stream the mounted /example.ogg via /different.ogg in server)
========

restart the icecast server
/etc/init.d/icecast2 restart

with your browser
http://localhost:8000/
(user: admin, pass: hackme, by default)

copy a audio.ogg or video.ogg in your “/usr/share/icecast2/web/” and test it with your player.

Ices2 config
(Ogg Vorbis streaming source for Icecast 2)

#apt-get install ices2

cd /usr/share/doc/ices2/examples/

To stream some pre-encoded ogg files

cp /usr/share/doc/ices2/examples/ices-playlist.xml /usr/share/icecast2/web/

edit the /usr/share/icecast2/web/ices-playlist.xml

ices-playlist.xml
==========
hostname localhost hostname
port 8000 port
password hackme password
mount /example1.ogg mount

param name=”restart-after-reread” 1 param (optional)
==========
you can hear it via
http://localhost:8000/example1.ogg

if you change it to /example.ogg,
then you can hear it via
http://localhost:8000/example.ogg
or
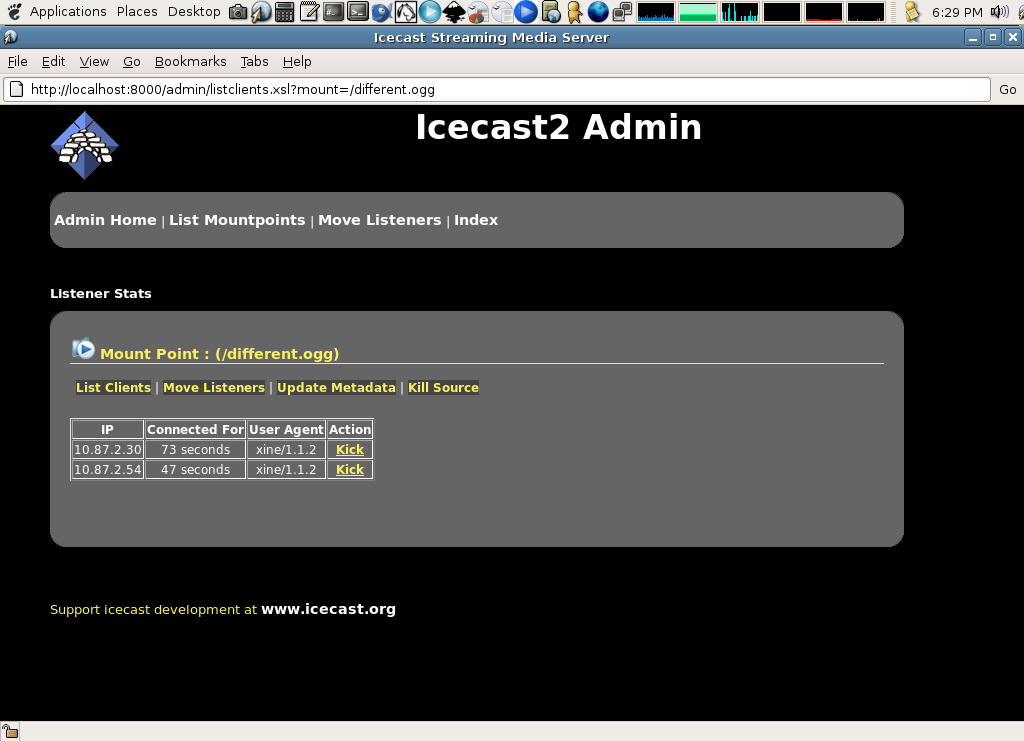
http://localhost:8000/different.ogg (via the relay)

create a playlist “playlist.txt” in /usr/share/icecast2/web/

playlist.txt
=======
fordername/01-name.ogg
fordername/02-name.ogg
fordername/03-name.ogg
………………………
=======

start the stream
# ices2 ices-playlist.xml

To stream from Input (alsa or oss)

cp /usr/share/doc/ices2/examples/ices-alsa.xml /usr/share/icecast2/web/

edit the /usr/share/icecast2/web/ices-alsa.xml if your need.

ices-alsa.xml
=========
hostname localhost hostname
port 8000 port
password hackme password
mount /example1.ogg mount
===========
you can hear it via
http://localhost:8000/example1.ogg

if you change it to /example.ogg,
then you can hear it via
http://localhost:8000/example.ogg
or
http://localhost:8000/different.ogg (via the relay)

start the live stream
# ices2 ices-alsa.xml

Video Streaming

#apt-get install ffmpeg ffmpeg2theora oggfwd

example:
#ffmpeg2theora output.ogg -x 320 -y 240 -V 150 -A 64 -o – –optimize | oggfwd localhost 8000 hackme /theora.ogg

(if your want to stream the output.ogg via mountpoint /theora.ogg in icecast server)
play http://localhost:8000/theora.ogg

done 🙂

bookmark_borderSuccess in Asterisk Clustering

HA

Provide a high-availability (clustering) solution for Linux which promotes reliability, availability, and serviceability (RAS) through a community development effort.

from: http://asteriskprojects.com/?page_id=4

ha.cf
————————————————————
logfacility local0
keepalive 2
deadtime 20
warntime 10
initdead 70
udpport 694
#baud 19200
#serial /dev/ttyS0 # Linux
bcast eth1 # Linux
#ucast eth1 192.168.43.12
auto_failback on
#stonith_host * baytech 10.0.0.3 mylogin mysecretpassword
#stonith_host ken3 rps10 /dev/ttyS1 kathy 0
#stonith_host kathy rps10 /dev/ttyS1 ken3 0

#set kernel “nowayout=0” for that
#watchdog /dev/watchdog
node asterisk1.local asterisk2.local
————————————————————–

haresources
————————————————————–
asterisk1.local 192.168.22.99/24/eth0 drbddisk::shared Filesystem::/dev/drbd0::/share::ext3 drbdlinks mysqld sendmail asterisk httpd munin-node vsftpd ircd xplhub amportal xinetd
————————————————————–

drbd.conf
————————————————————–
global {
}

resource “shared” {
protocol C;
incon-degr-cmd “echo ‘!DRBD! pri on incon-degr’ | wall ; sleep 60 ; halt -f”;
startup {
wfc-timeout 0; ## Infinite!
degr-wfc-timeout 120; ## 2 minutes.
}
disk {
on-io-error detach;
}
net {
# timeout 60;
# connect-int 10;
# ping-int 10;
# max-buffers 2048;
# max-epoch-size 2048;
}
syncer {
rate 10M;
group 1;
}

on asterisk1.local {
device /dev/drbd0;
disk /dev/sda4;
address 192.168.43.11:7789;
meta-disk internal;
}

on asterisk2.local {
device /dev/drbd0;
disk /dev/hda4;
address 192.168.43.12:7789;
meta-disk internal;
}
}

————————————————————–

authkeys
————————————————————–
auth 1
1 crc
#2 sha1 HI!
#3 md5 Hello!
————————————————————–

bookmark_borderSuccess in OpenNMS


Today I setup OpenNMS in Debian sarge

/etc/apt/source/list
deb http://debian.opennms.org/ debian/opennms stable

# apt-get install java-common
# apt-get install sun-jdk1.4-installer
# build-sun-jdk14 ./j2sdk-1_4_2_05-linux-i586.bin
# dpkg -i j2sdk-1_4_2_05-linux-i586.deb

java-virtual-machine meta-package
# apt-get install java-virtual-machine

#apt-get install tomcat4 tomcat4-admin tomcat4-webapps

# apt-get install rrdtool
# apt-get install mrtg

/etc/postgresql/postgresql.conf

tcpip_socket = true
shared_buffers = 1024

/etc/postgresql/pg_hba.conf
# TYPE DATABASE USER IP-ADDRESS IP-MASK METHOD
local all all trust
host all all 127.0.0.1 255.255.255.255 trust
host all all ::1 ffff:ffff:ffff:ffff:ffff:ffff:ffff:ffff trust

#apt-get install opennms opennms-common opennms-contrib opennms-db opennms-server opennms-webapp

Search for a JRE (suggested)
#cd /usr/share/opennms/bin
#./runjava -s

Run the Installer to Setup the PostgreSQL Database
#cd /usr/share/opennms/
#install -disU

Run the Installer to Setup the Web Application
#cd /usr/share/opennms/
# ./install -w /var/lib/tomcat4/webapps -W /var/lib/tomcat4/server/lib

edit /usr/share/opennms/etc/discovery-configuration.xml

include-range retries=”2″ timeout=”3000″
begin 192.168.0.1 begin
end 192.168.0.254 end

start or restart

# /etc/init.d/postgres start
# /etc/init.d/tomcat4 start
# /etc/init.d/opennms start

http://opennms_installed_pc_ip:8180/opennms/

The initial user name is “admin” and the password is “admin”.
(note: 8180 for debian)
(other Linux http://host:8080/opennms/)

edit capsd-configuration.xml for the service your want to monitor

capsd-configuration.xml
==============
scan=”on”

example:
protocol-plugin protocol=”Postgres” class-name=”org.opennms.netmgt.capsd.TcpPlugin” scan=”on” user-defined=”false”
==============

your can finish here if u do not want to enable snmp & notification.

Enable SNMP in a server that you want to monitor. Then…

edit datacollection-config.xml to enable more monitoring graph in opennms.

datacollection-config.xml
===============
snmp-collection name=”default”
maxVarsPerPdu = “50”
snmpStorageFlag = “all”
rrd step = “300”
===============

edit the snmp-config.xml to track servers with snmp

snmp-config.xml
==========
specific 192.168.25.32 specific
range begin=”192.168.25.1″ end=”192.168.25.254″
==========

edit poller-configuration.xml

poller-configuration.xml
===============
status=”on”

example:
service name=”SMTP” interval=”300000″ user-defined=”false” status=”on”
===============

edit notifd-configuration.xml to enable notification
==============================
status=”on”

example:
notifd-configuration
status=”on”
pages-sent=”SELECT * FROM notifications”
next-notif-id=”SELECT nextval(‘notifynxtid’)”
next-group-id=”SELECT nextval(‘notifygrpid’)”
==============================

edit javamail-configuration.properties for mail notification

javamail-configuration.properties
====================
# Properties are defined but commented out indicating the default values.
# This property defines system sender account.
#
# The default setting is root@[127.0.0.1]
#org.opennms.core.utils.fromAddress=root@localhost

#
# This property defines SMTP Host.
#
org.opennms.core.utils.mailHost=smtp.xyz.net
org.opennms.core.utils.mailer=smtpsend
org.opennms.core.utils.transport=smtp
org.opennms.core.utils.debug=true
#
# This property defines Mail authentication.
# The default setting is false
#org.opennms.core.utils.authenticate=false
#org.opennms.core.utils.authenticateUser=”opennms”
#org.opennms.core.utils.authenticatePassword=”opennms”

# This property controls the use of the JMTA, the
# default is true
#org.opennms.core.utils.useJMTA=true
==========================

set the email address via opennms visual configuration to receive emails.

done 🙂

bookmark_borderWifi in debian

Today I configure Asus Spacelink WL-167g USB2 adapter in debian sid


“Asus Spacelink WL-167g USB2 adapter” which works with the
rt2570 driver, the sources of which can be downloaded on the RALINK website.

more

#apt-get install rt2570-source
#module-assistant

then it will build the rt2570-modules-2.6.17-2-686 (if u use kernel 2.6.17)

#modprobe rt2570

my /etc/network/interfaces
————————–
auto eth1
iface eth1 inet dhcp
wireless-essid your_ID
wireless-mode managed
wireless-key your_secret_key
————————–

bookmark_borderallbn2unicode

i have started a project called allbn2unicode

#include stdio.h
#include stdlib.h
#include string.h
#include wchar.h
#include locale.h
#include langinfo.h

int main(int argc, char *argv[])
{
FILE *fp;
FILE *fp2;
wchar_t wr[80];
wchar_t *wca;
wchar_t hex,*hex2;
char str[80],*store;
int i,len;

/* set locale for bangla */
setlocale(LC_ALL, “bn_BD.UTF-8”);

store = str;

wca = wr;

if(argc!=3){
printf(“name n”);
exit(1);
}

if((fp = fopen(argv[1], “r”)) == NULL) {
printf(“Cannot open file.n”);
exit(1);
}

fgetws(wca, 100, fp);

/* if(fread(store,sizeof(store),1, fp) !=1) {
printf(“Cannot open file.n”);
exit(1);
} */

/* optional for asci file mbstowcs(wca, store,20);*/

fclose(fp);

if((fp2 = fopen(argv[2], “wb”)) == NULL) {
printf(“Cannot write file.n”);
}

if(wr[0]==0x0985)
{
hex=0x0987;
}
else

hex=0x0985;

fputws(wca,fp2);

fclose(fp2);

return 0;
}

bookmark_borderEDGE/GPRS in Linux

Today me (salahuddin66) and Lavluda successfully configured GPRS/EDGE in Linux.

Using wvdial

to check your mobile/modem as a modem
——————————-
#wvdialconf

it will generate /etc/wvdial.conf file for you.

Grameen Phone
For Grameen Phone your need to add

Init3 = AT+CGDCONT=1,”IP”,”gpinternet”

here is a sample of my /etc/wvdial.conf (Grameen Phone EDGE/GPRS)
————————————————————
[Dialer Defaults]
Init1 = ATZ
Init2 = ATQ0 V1 E1 S0=0 &C1 &D2 +FCLASS=0
Init3 = AT+CGDCONT=1,”IP”,”gpinternet”
Modem Type = Analog Modem
ISDN = 0
Phone = *99***1#
Modem = /dev/ttyUSB0
Username = xyz
Password = xyz
Baud = 115200
———————————————————–
wvdialconf will generate the modem speed/Baud and /dev/xyz path according to your mobile phone

Aktel, Teletalk
here is a sample of my /etc/wvdial.conf
————————————————————
[Dialer Defaults]
Init1 = ATZ
Init2 = ATQ0 V1 E1 S0=0 &C1 &D2 +FCLASS=0
Modem Type = Analog Modem
ISDN = 0
Phone = *99***1#
Modem = /dev/ttyUSB0
Username = xyz
Password = xyz
Baud = 115200
———————————————————–
wvdialconf will generate the modem speed/Baud and /dev/xyz path according to your mobile phone

Start
To start type wvdial in shell

Note:
If you have problem while generating wvdial.conf file in /etc/wvdial.conf then delete the old config file /etc/wvdial.conf and give wvdialconf to create a new configuraton file.

if you have any problem to find the /dev path for your mobile/modem, give

# tail -f /var/log/syslog

Then connect the phone/modem.
You can also use gnome-ppp or other ppp tools to connect.

Using gnome-ppp

Give phone number *99***1#

click on the detect. it will try to detect your phone/modem.
note: If it fails then give your /dev path manually. Search for you modem using #tail -f /var/log/syslog then connect the phone/modem.

it found my phone/modem in /dev/ttyUSB0

click Init Strings.
for Aktel, Teletalk and others (you do not need to change anything)

click Init Strings.
add Init3 only if you are using Grameen Phone EDGE/GPRS (only for GP)

after click connect

connected

details view

Note: If you face any problem using this as user. Run gnome-ppp as root
or check you are a member of dip group.

In Debian or Ubuntu based distro give #adduser your_user_name dip if your are not a member.

bookmark_borderall2theora

here is my all2theora script

(Thanks to my friend Zaher for fixing the Divx problem “-vf harddup”)
(based on Florian Schilhabel dvd2divx script Licence: GPL)

#!/usr/bin/perl

use Getopt::Long;

GetOptions( “help” => $help,
“i=s” => $input,
“divx=s” => $divx, );

if ($help) {
print “Welcome to the ALL2theora Helper Scriptn”;
print “n”;
print “this script encodes a all file to theoran”;
print “Usage:n”;
print “–help show this textn”;
print ” this will only be possible if you are rootn”;
print “–i Specify the Name of your Video filen”;
exit;
}

if ($input eq “”) {
print “No Input file selected – You must specify one with: –i filename.n”;
print “n”;
print “this script encodes a all file to theoran”;
print “Usage:n”;
print “–help show this textn”;
print ” this will only be possible if you are rootn”;
print “–i Specify the Name of your Video filen”;
exit;
}

if ($divx eq “on”) {

system (“mkfifo stream.yuv && chmod 777 stream.yuv && mencoder $input -ovc lavc -oac copy -o tmp.avi -lavcopts vcodec=mpeg1video:vbitrate=1200 -vf harddup -of mpeg && mplayer -vc dummy -vo null -ao pcm:file=stream.wav tmp.avi && encoder_example stream.wav stream.yuv > theora.ogg | mplayer -ao null -nosound -vo yuv4mpeg tmp.avi – 1>/dev/tty7 8>/dev/tty7 && rm stream.yuv && rm stream.wav && rm tmp.avi”);
exit;
}

if ($divx eq “off”) {
system (“mkfifo stream.yuv && chmod 777 stream.yuv && mplayer -vc dummy -vo null -ao pcm:file=stream.wav $input && encoder_example stream.wav stream.yuv > theora.ogg | mplayer -ao null -nosound -vo yuv4mpeg $input – 1>/dev/tty7 8>/dev/tty7 && rm stream.yuv && rm stream.wav”);
exit;
}

if ($divx eq “”) {
system (“mkfifo stream.yuv && chmod 777 stream.yuv && mplayer -vc dummy -vo null -ao pcm:file=stream.wav $input && encoder_example stream.wav stream.yuv > theora.ogg | mplayer -ao null -nosound -vo yuv4mpeg $input – 1>/dev/tty7 8>/dev/tty7 && rm stream.yuv && rm stream.wav”);
exit;
}

print “Video Filename: $inputn”;
print “working…n”;

exit;

Licence: GPL