bookmark_borderMultiple Internet connection in Linux

I was facing trouble to use EDGE/GPRS (ppp) with another Ethernet connection together.
Ethernet connection was used for local network.

# ip route show
10.64.64.64 dev ppp0  proto kernel  scope link  src 10.130.4.218
192.168.1.0/24 dev eth0  proto kernel  scope link  src 192.168.1.2  metric 1
default via 192.168.1.1 dev eth0  proto static

ppp connected but still default route is eth0. To use the ppp connection as default

# ip route change default via 10.64.64.64 dev ppp0

You will find

# ip route show
10.64.64.64 dev ppp0  proto kernel  scope link  src 10.130.4.218
192.168.1.0/24 dev eth0  proto kernel  scope link  src 192.168.1.2  metric 1
default via 10.64.64.64 dev ppp0

remember you may need to set the nameserver (edit the /etc/resolv.conf).

On the other hand you may have 2 default connection settings:

# ip route show
10.64.64.64 dev ppp0  proto kernel  scope link  src 10.130.130.252
192.168.1.0/24 dev eth0  proto kernel  scope link  src 192.168.1.1
172.16.0.0/16 dev eth1  proto kernel  scope link  src 172.16.8.69
default via 172.16.8.1 dev eth1
default via 10.64.64.64 dev ppp0  proto static

I mainly want to use ppp0, so I am removing the eth1 from default list:

#ip route del default via 172.16.8.1

If you want to use multiple uplinks/providers:
http://tldp.org/HOWTO/Adv-Routing-HOWTO/lartc.rpdb.multiple-links.html
http://lartc.org/howto/lartc.rpdb.multiple-links.html

example:

#ip route change default scope global nexthop via 10.64.64.64 dev ppp0  weight 2 nexthop via 192.168.1.1 dev eth0 weight 1

Install “iptraf”, which is an useful tool for analysis:

#apt-get install iptraf

You can also define any IP address  to use specific connection.
This might helpful if you want to listen on-line radio without interrupting your main work.

I am specifying an IP address for listening an on-line radio station by using a backup slow connection via eth1:

#ip route add 85.xx.174.181 via 172.16.8.1 dev eth1

-enjoy

bookmark_borderDebian Kiosk

I have configured a kiosk using Debian GNU/Linux with blackbox window manager.

The challenges:
1. Touchscreen configuration.
2. Autometic login and start X server.
3. Start desired application for kiosk.
4. A boot splash for booting and shutdown.
 
1. Touchscreen configuration:
First, setup touchscreen driver and configure it according to your device specification.
I was using eGalax driver, which I have downloaded from
source: http://home.eeti.com.tw/web20/eg/drivers.htm

2. Automatic login:
Edit /etc/inittab and comment the following line:

#1:2345:respawn:/sbin/getty 38400 tty1

add the following line below:

1:2345:respawn:/bin/login -f USER_LOGIN tty1 /dev/tty1 2>&1 

Edit .bash_profile (create if require) and add the following line at bottom:

startx

source: http://www.debianadmin.com/how-to-auto-login-and-startx-without-a-display-manager-in-debian.html

Blackbox window manager:
Edit ~/.xinitrc (or ~/.Xsession), create if require, and add the following line:

exec blackbox

3. Autostart application:
To autostart iceweasel/firefox:
Again edit ~/.xinitrc (or ~/.Xsession) and add the following line:

firefox &
exec blackbox

source: http://blackboxwm.sourceforge.net/BlackboxFAQ/StartupAndShutdown

Install iceweasel/firefox plugin “R-kiosk” from https://addons.mozilla.org/en-US/firefox/addon/1659

3. Bootsplash:
Install a bootsplash

apt-get install splashy

Create your own bootsplash and set it

# splashy_config -c

To enable splashy, you may need to edit grub.config and add the following after “kernel…ro quiet”

vga=791 splash

source: http://splashy.alioth.debian.org/wiki/faq

Tips and tricks:
“X: user not authorized to run the X server”
You can allow the user to use run startx by:

#dpkg-reconfigure x11-common

or edit  /etc/X11/Xwrapper.config

allowed_users=anybody 

“Auto login problem”
 If you have setup GDM (XDM) earlier, then you need to disable it for automatic log in

#update-rc.d -f gdm remove

If you want to enable it simply run (experiment purpose):

#update-rc.d -f gdm defaults

source: http://www.debianadmin.com/howto-boot-debian-in-text-mode-instead-of-graphical-mode-gui.html

Kiosk performance tuning:
Install the CPU frequency related tools and configure it.
details: http://wiki.debian.org/HowTo/CpuFrequencyScaling

resources:
http://www.debianadmin.com/debirf-build-a-kernel-and-initrd-to-run-debian-from-ram.html
http://cmrg.fifthhorseman.net/wiki/debirf

bookmark_borderGet system load using Python Script

I have written a simple python script that collect system load information and store in a XML file.

#!/usr/bin/env python

import os
import commands
import time
from time import gmtime, strftime

while 0 < 10:
 
 file_name = strftime("%Y_%m_%d_%H_%M", gmtime()) 

 data =  commands.getoutput("w | grep load")
 xml_data = ""+ data + ""
 
 print xml_data
 
 
 if os.path.isfile(file_name + ".xml"):
  x=0
 else:

  f_prev=open(file_name + ".xml", 'a')
  f_prev.write("")
  f_prev.close

  f=open(file_name + ".xml", 'w')
  f.write("nn")
  f.close()

 
 f=open(file_name + ".xml", 'a')

 f.write(xml_data+"n")

 f.close()
 time.sleep(3)

We will get XML file like this.

<?xml version=’1.0′ encoding=’utf-8′?>
<data>
<load> 01:40:38 up 6:27, 3 users, load average: 0.07, 0.07, 0.03</load>
<load> 01:40:48 up 6:27, 3 users, load average: 0.06, 0.07, 0.03</load>
<load> 01:40:58 up 6:27, 3 users, load average: 0.05, 0.07, 0.03</load>
</data>

bookmark_borderputpixel in Linux

Some days ago I was trying to read a BMP format file and show it using putpixel.

I haved used qdbmp.sourceforge.net which is a minimalistic cross-platform C library for handling BMP image file.

The Allegro (www.allegro.cc) graphics library that provides many functionality.

putpixel
Writes a pixel into a bitmap.
Description void putpixel(BITMAP *bmp, int x, int y, int color);

Download qdbmp.c qdbmp.h from the qdbmp website

Sample code that reads a BMP file and show it using Allegro library

/*
* Example program for the Allegro library, by Shawn Hargreaves.
*
* This is a very simple program showing how to get into graphics
* mode and draw text onto the screen.
*/

#include <allegro.h>
/* Creates a negative image of the input bitmap file */
#include “qdbmp.h”
#include <stdio.h>

int main( int argc, char* argv[] )
{
BMP* bmp;
UCHAR r, g, b;
UINT width, height;
UINT x, y;

int color;
/* you should always do this at the start of Allegro programs */
if (allegro_init() != 0)
return 1;

/* set up the keyboard handler */
install_keyboard();

/* set a graphics mode sized 320×200 */
if (set_gfx_mode(GFX_AUTODETECT, 320, 200, 0, 0) != 0) {
if (set_gfx_mode(GFX_SAFE, 320, 200, 0, 0) != 0) {
set_gfx_mode(GFX_TEXT, 0, 0, 0, 0);
allegro_message(“Unable to set any graphic moden%sn”, allegro_error);
return 1;
}
}

/* set the color palette */
set_palette(desktop_palette);

/* clear the screen to white */
clear_to_color(screen, makecol(255, 255, 255));

/* you don’t need to do this, but on some platforms (eg. Windows) things
* will be drawn more quickly if you always acquire the screen before
* trying to draw onto it.
*/
acquire_screen();

/* write some text to the screen with black letters and transparent background */
// textout_centre_ex(screen, font, “Hello, world!”, SCREEN_W/2, SCREEN_H/2, makecol(0,0,0), -1);

if ( argc != 3 )
{
fprintf( stderr, “Usage: %s <input file> <output file>n”, argv[ 0 ] );
return 0;
}

/* Read an image file */
bmp = BMP_ReadFile( argv[ 1 ] );
BMP_CHECK_ERROR( stderr, -1 ); /* If an error has occurred, notify and exit */

/* Get image’s dimensions */
width = BMP_GetWidth( bmp );
height = BMP_GetHeight( bmp );

/* Iterate through all the image’s pixels */
for ( x = 0 ; x < width ; ++x )
{
for ( y = 0 ; y < height ; ++y )
{
/* Get pixel’s RGB values */
BMP_GetPixelRGB( bmp, x, y, &r, &g, &b );

color = makecol(r,g,b);

putpixel(screen, x, y, color);

/* Invert RGB values */
BMP_SetPixelRGB( bmp, x, y, 255 – r, 255 – g, 255 – b );
}
}

// putpixel(screen, SCREEN_W/2, SCREEN_H/2, 50);

/* you must always release bitmaps before calling any input functions */
release_screen();

/* wait for a key press */
readkey();

/* Save result */
BMP_WriteFile( bmp, argv[ 2 ] );
BMP_CHECK_ERROR( stderr, -2 );

/* Free all memory allocated for the image */
BMP_Free( bmp );

return 0;
}

END_OF_MAIN()

Compile
$gcc -g -O2 -o name `allegro-config –libs` sample.c qdbmp.c

Resources:
http://qdbmp.sourceforge.net/
http://www.allegro.cc/manual/api/drawing-primitives/putpixel
http://www.allegro.cc/manual/api/truecolor-pixel-formats/makecol

bookmark_borderHDD Partitioning in Linux

Technically, a hard disk should contain either as many as four primary partitions, or one to three primaries along with a single extended partition. Each of these partitions are described by a 16-byte entry in the Partition Table which is located in the Master Boot Record.

src: http://en.wikipedia.org/wiki/Partition_(computing)

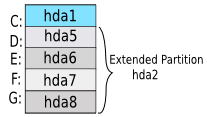
Many poeple confused with Linux partitioning system when they are installing Linux for the first time. In linux they see hda1 then hda5 but they are familiar with C:, D: etc

your HDD can be recognize by hda, hdb,hdc,hdd, sda, sdb etc depending on the master, slave and cable position. Here i am describing with hda


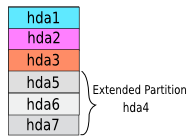
A HDD with 4 Primary Partitions


here hda4 is the full extended partion so extended partition start from hda5

generally a windows / most of the PC has this type of partition system.

here hda2 is the full extended partion and hda3 and hda4 are reserved as we can create 2 more primary partitions so extended partition start from hda5

Extended partition generally start from hda5

so if anyone want to install linux in his G: drive then he need to delete the hda8 then create 2 partitions

one swap space (it can be compare with windows virtual memory) ram * 2 (size recomanded) and another root / partition.

Note: I would suggest to create swap first then root / partition and at the last of the HDD sector more then or at least 8 MB free unallocated space. When user need to reinstall windows sometimes it creates problem, if there is no free unallocated space.